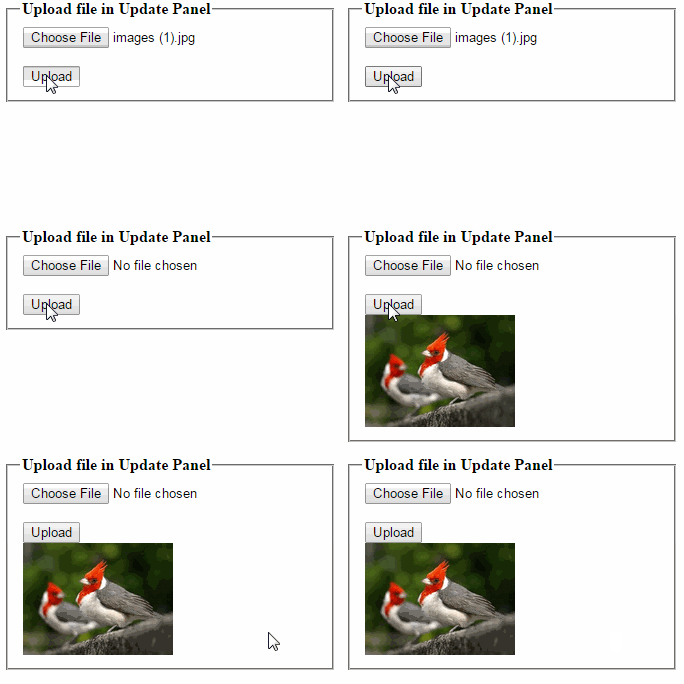
 The
FileUpload control doesn’t work for uploading image when placed in the Update
Panel. In update panel allow Asynchronous postback since FileUpload control
required full postback to get the image. If you check FileUpload1.HasFile
method or FileUpload1.FileName property then it is null, because the
update panel does not retain the file inside
the FileUpoad control.
In this
article I will explain how to upload Image/ file through File Upload Control
that is placed inside Update Panel in asp.net Ajax using both C# and VB.Net
languages. This is vaery common problem when we work with update panel and file
upload control.
Solution of the Problem:
We have
to set the Button that is uploading the image to be PostBackTrigger instead of
AsyncPostBackTrigger. Due to this,
upload button will cause the full post back and get and retain the image in the
FileUpload control.
So set it as:
<Triggers>
<asp:PostBackTrigger ControlID="btnUpload" />
</Triggers>
Source
Code
Design
Section: In design page places a FileUpload Control and a Button
control and also place ScriptManager from.
Create a folder in the root directory of your project
to store images and give it name “Images”.
div>
<fieldset style="width:250px;">
<legend>Upload file example in asp.net</legend>
<asp:ScriptManager ID="ScriptManager1" runat="server">
</asp:ScriptManager>
<table>
<tr>
<td>
<asp:UpdatePanel ID="UpdatePanel1" runat="server">
<ContentTemplate>
<asp:FileUpload ID="FileUpload1" runat="server" />
<asp:Button ID="btnUpload" runat="server" Text="Upload"
onclick="btnUpload_Click" /><br />
<asp:Image ID="imgShow" runat="server" Width="150px" />
</ContentTemplate>
<Triggers>
<asp:PostBackTrigger ControlID="btnUpload" />
</Triggers>
</asp:UpdatePanel>
</td>
</tr>
</table>
</fieldset>
</div>
C#.Net Code to upload
image through FileUpload Control in Update Panel using Asp.Net
Write following
code on the upload button’s click event as:
protected void btnUpload_Click(object sender, EventArgs e)
{
if (FileUpload1.HasFile)
{
string ImgPath = Server.MapPath("~/Images/" + Guid.NewGuid() + FileUpload1.FileName);
FileUpload1.SaveAs(ImgPath);
string ShowImgPath = ImgPath.Substring(ImgPath.LastIndexOf("\\"));
imgShow.ImageUrl = "~/Images" + ShowImgPath;
}
else
{
ScriptManager.RegisterStartupScript(this, this.GetType(), "Message", "alert('Please select the image to upload');", true);
}
}
Note: If you want to restrict users to upload only image file or ms word/ms excel etc file then read the article Validate and upload image files in asp.net
VB.Net Code to upload
image through FileUpload Control in Update Panel using Asp.Net
First
design the page as mentioned in the source code above but replace the line
<asp:ButtonID="btnUpload" runat="server" Text="Upload" onclick="btnUpload_Click" />
with the
line
<asp:Button ID="btnUpload" runat="server" Text="Upload"/>
In the
code behind file(.aspx.vb) write the code on the upload button’s click event
as:
Protected Sub btnUpload_Click(sender As Object, e As System.EventArgs) Handles btnUpload.Click
If FileUpload1.HasFile Then
Dim ImgPath As String = Server.MapPath(("~/Images/" & Convert.ToString(Guid.NewGuid())) + FileUpload1.FileName)
FileUpload1.SaveAs(ImgPath)
Dim ShowImgPath As String =
ImgPath.Substring(ImgPath.LastIndexOf("\"))
imgShow.ImageUrl = "~/Images" & ShowImgPath
Else
ScriptManager.RegisterStartupScript(Me, Me.[GetType](), "Message", "alert('Please select the image to upload');", True)
End If
End Sub


0 comments:
Post a Comment